初识MQ

同步和异步通讯

  • 微服务间通讯有同步和异步两种方式
    • 同步通讯:就像打电话,需要实时响应,而且通话期间,不能响应其他的电话,当有其他妹子给你打电话的时候,就容易错失良机。时效性强
    • 异步通讯:就像发邮件,QQ/微信聊天,不需要马上回复。可以同时给多个妹子发消息,支持多线操作,时间管理大师的必备技能。时效性弱
  • 两种方式各有优劣,打电话可以立即得到响应,但是却不能与多个人同时通话,发送邮件可以同时与多个人收发邮件,但是往往响应会有延迟

【打电话 VS 发QQ】

同步通讯

  • 我们之前学习的Feign调用就属于同步方式,虽然调用可以实时得到结果,但是存在一些问题。订单服务,仓储服务,短信服务是和我们的支付服务耦合在一起的。
1
2
3
4
5
6
public void PaymentService() {
orderService.doSth();
storageService.doSth();
messageService.doSth();
...
}
  • 例如产品经理一拍脑门,让加一个业务,然后你就需要去支付服务中改动代码,让你删除某个服务,也需要去支付服务中改动代码,耦合度太高了
  • 同时,性能也是一个问题,例如支付服务需要50ms,另外三个服务各需要150ms,那么一个完整的支付服务就需要恐怖的0.5s,也就是一秒只能完成两个请求,这么低的并发,还玩个锤子。
  • 支付服务在等待订单服务完成的时候,也在占用着CPU和内存,却啥也不干,浪费系统资源。
  • 假如这时仓储服务还挂掉了,那么请求就会卡在这里,如果积压了很多的请求,支付服务就会将系统资源耗尽,从而整个支付服务都挂掉了
  • 综上所述,同步调用存在以下问题
    1. 耦合度高:每次加入新的请求,都需要修改原来的代码
    2. 性能下降:调用者需要等待服务提供者响应,如果调用链过长,则响应时间等于每次调用服务的时间之和
    3. 资源浪费:调用链中的每个服务在等待响应过程中,不能释放请求占用资源,高并发场景下会极度浪费系统资源
    4. 级联失败:如果服务提供者出现问题,那么调用方都会跟着出现问题,就像多米诺骨牌一样,迅速导致整个微服务故障

异步通讯

  • 异步调用可以避免上述问题
    • 我们以购买商品为例,用户支付后需要调用订单服务完成订单状态修改,调用物流服务,从仓库分配响应的库存并准备发货
    • 在事件模式中,支付服务是事件发布者(publisher),在支付完成后只需要发布一个支付成功的事件(event),事件中带上订单id,
    • 订单服务和物流服务是事件订阅者(Consumer),订阅支付成功的事件,监听到事件后完成自己的业务即可
  • 为了解除事件发布者与订阅者之间的耦合,两者并不是直接通信,而是由一个中间人(Broker)来代理。发布者发布事件到Broker,不关心谁来订阅的事件。而订阅者从Broker订阅事件,不关心是谁发布的事件
  • 那么此时产品经理让你添加一个新服务时,你只需要让新服务来订阅事件就好了,而取消一个服务,也只需要让其取消订阅事件,并不需要修改订单服务,这样就解除了服务之间的耦合
  • 同时也能带来性能上的提升,之前我们完成一个支付服务,需要耗时500ms,而现在支付服务只需要向Broker发布一个支付成功的事件,剩下的就不用它管了,这样只需要60ms就能完成支付服务
  • 服务没有强依赖,不用担心级联失败问题。在之前,如果仓储服务挂掉了,那么支付服务无法完成,占用资源。此时更多的请求过来,支付服务就会耗尽系统资源,从而整个支付服务都瘫痪了。但是现在,仓储服务就算挂掉了,也丝毫不会影响到我们的支付服务,同时支付服务也不需要等待存储服务完成,期间也不会占用无意义的系统资源。
  • 流量削峰:不管发布事件的流量波动多大,都由Broker接收,订阅者可以按照自己的速度去处理事件。
  • 我们发现整个异步通讯过程中,所有东西都是依赖于Broker来实现的,那么如果Broker挂了,整个微服务也完蛋了。
  • 异步通讯的优点
    • 耦合度低
    • 吞吐量提升
    • 故障隔离
    • 流量削峰
  • 异步通讯的缺点
    • 依赖于Broker的可靠性、安全性、吞吐能力
    • 架构复杂时,业务没有明确的流程线,不好追踪管理(出了bug都不好找)
  • 好在现在开源平台上的 Broker 的软件是非常成熟的,比较常见的一种就是我们这里要学习的MQ技术。

技术对比

  • MQ(MessageQueue)中文是消息队列,字面意思就是存放消息的队列,也就是事件驱动中的Broker
  • 比较常见的MQ实现
    • ActiveMQ
    • RabbitMQ
    • RockerMQ
    • Kafka
  • 几种常见的MQ对比
RabbitMQ ActiveMQ RocketMQ Kafka
公司/社区 Rabbit Apache 阿里 Apache
开发语言 Erlang Java Java Scala&Java
协议支持 AMQP,XMPP,SMTP,STOMP OpenWire,STOMP,REST,XMPP,AMQP 自定义协议 自定义协议
可用性 一般
单机吞吐量 一般 非常高
消息延迟 微秒级 毫秒级 毫秒级 毫秒以内
消息可靠性 一般 一般
  • 追求可用性:Kafka、RockerMQ、RabbitMQ
  • 追求可靠性:RabbitMQ、RocketMQ
  • 追求吞吐能力:RocketMQ、Kafka
  • 追求消息低延迟:RabbitMQ、Kafka

快速入门

安装RabbitMQ

  • 这里是在CentOS 7虚拟机中使用Docker安装的
  • 拉取镜像
1
docker pull rabbitmq:3-management
  • 使用docker images查看是否已经成功拉取,之后启动一个RabbitMQ容器
1
2
3
4
5
6
7
8
9
docker run \
-e RABBITMQ_DEFAULT_USER=root \
-e RABBITMQ_DEFAULT_PASS=root \
--name mq \
--hostname mq1 \
-p 15672:15672 \
-p 5672:5672 \
-d \
rabbitmq:3-management
  • 其中:两个环境变量分别配置登录用户和密码,15672是rabbitMQ的管理平台的端口,5672是将来做消息通信的端口

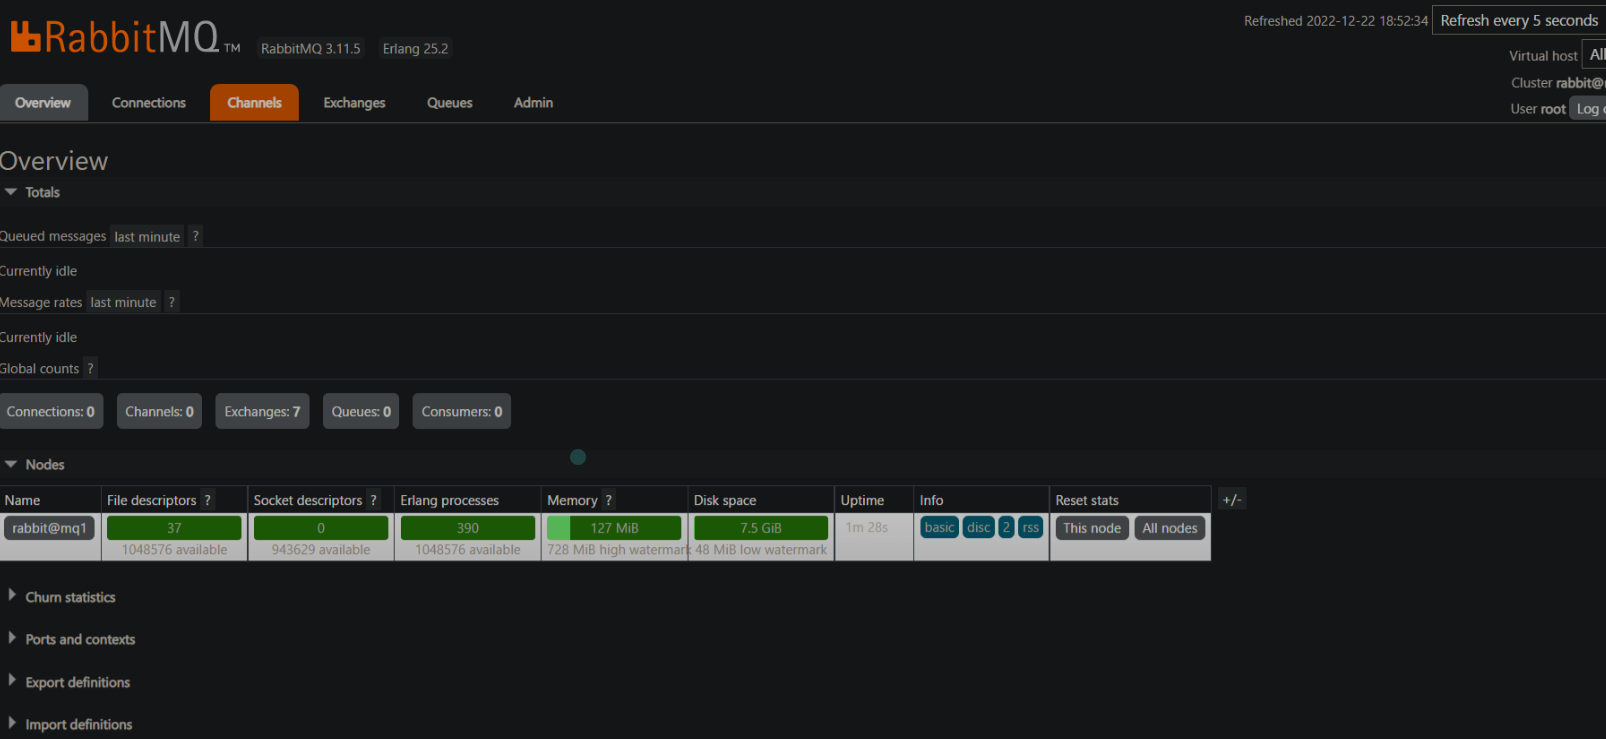
容器启动成功之后,我们输入虚拟机ip:15672访问RabbitMQ的管理平台

image-20240602222731719

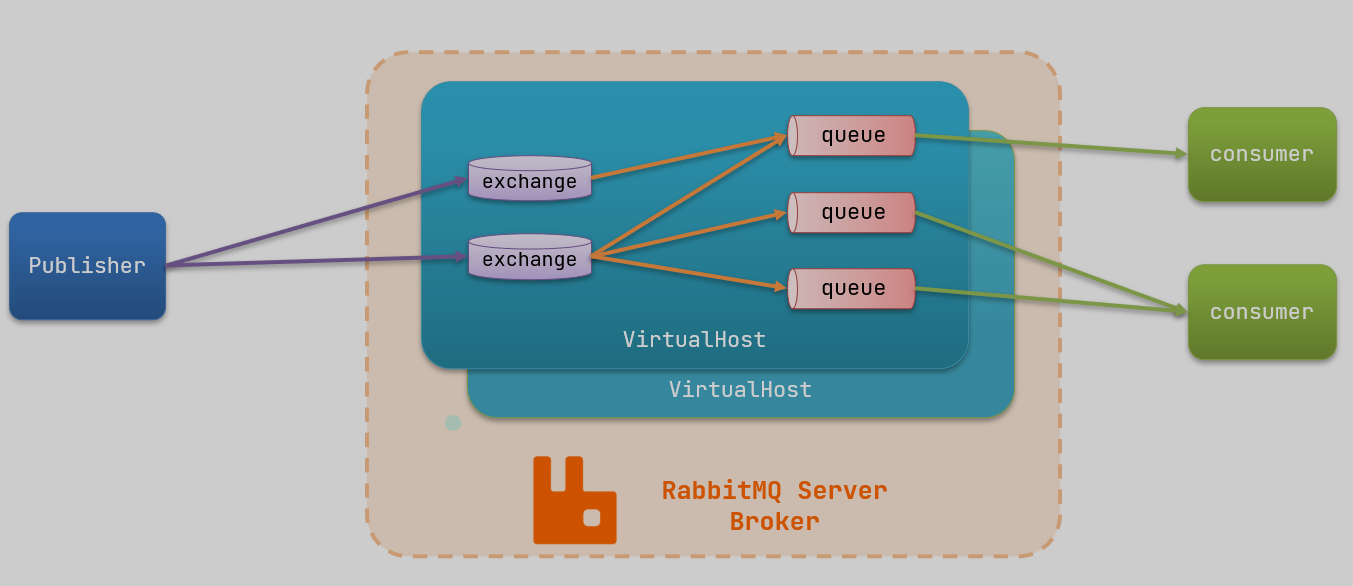
RabbitMQ中的一些角色:

  • publisher:生产者
  • consumer:消费者
  • exchange:交换机,负责消息路由
  • queue:队列,存储消息
  • virtualHost:虚拟主机,隔离不同租户的exchange、queue、消息的隔离

image-20240602222756006

比喻一下

  1. Publisher(生产者):就像是一个邮局,它负责创建和发送消息。比如,当你在一个购物网站上下单后,购物网站(生产者)会创建一个包含你订单信息的消息,然后发送到RabbitMQ。
  2. Consumer(消费者):就像是你的邮箱,它负责接收和处理消息。比如,购物网站的库存系统(消费者)会从RabbitMQ中接收到你的订单消息,然后进行相应的处理,比如减少库存。
  3. Exchange(交换机):就像是一个邮局的分拣员,它负责根据一定的规则将生产者发送的消息路由到相应的队列。比如,购物网站的订单消息会被路由到处理订单的队列,而退货消息则会被路由到处理退货的队列。
  4. Queue(队列):就像是邮局的储物柜,它负责存储消息,等待消费者来取走。比如,处理订单的队列会存储所有的订单消息,等待库存系统来取走。
  5. VirtualHost(虚拟主机):就像是一个大楼的不同层,它可以将不同的交换机、队列、消息隔离开来。比如,购物网站可以将处理订单的交换机和队列放在一个虚拟主机,将处理退货的交换机和队列放在另一个虚拟主机,这样就可以避免他们之间的相互影响。

RabbitMQ消息类型

  • RabbitMQ官方提供了5个不同的Demo实例,对应了不同的消息模型

    1. 基本消息类型(BasicQueue)
    2. 工作消息队列(WorkQueue)
    • 其中发布订阅(Publish、Subscribe),又根据交换机类型不同,分为三种
      1. 广播(Fanout Exchange)
      2. 路由(Direct Exchange)
      3. 主题(Topic Exchange)

导入Demo工程

  • 包括三部分:
    • mq-demo:父工程,管理项目依赖
    • publisher:消息的发送者
    • consumer:消息的消费者

入门案例

RabbitMQ 是一个消息代理:它接受和转发消息。您可以把它想象成一个邮局:当您将要投寄的邮件放入邮箱时,您可以确定邮递员最终会将邮件投递给您的收件人。在这个类比中,RabbitMQ 是一个邮箱、一个邮局和一个邮递员。
RabbitMQ 和邮局之间的主要区别在于它不处理纸张,而是接受、存储和转发二进制数据块——消息。

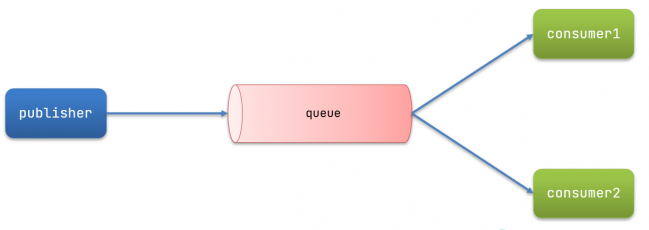
  • 官方的HelloWorld是基于最基础的消息队列模型来实现的,只包括三个角色:
    • publisher:消息发布者,将消息发送到队列queue
    • queue:消息队列,负责接受并缓存消息
    • consumer:订阅队列,处理队列中的消息

image-20240602223252480

publisher实现

  1. 建立连接
  2. 创建Channel
  3. 声明队列
  4. 发送消息
  5. 关闭连接和Channel
1
2
3
4
5
6
7
8
9
10
11
12
13
14
15
16
17
18
19
20
21
22
23
24
25
26
27
28
29
30
31
32
33
34
35
36
37
38
39
40
import com.rabbitmq.client.Channel;
import com.rabbitmq.client.Connection;
import com.rabbitmq.client.ConnectionFactory;
import org.junit.Test;

import java.io.IOException;
import java.util.concurrent.TimeoutException;

public class PublisherTest {
@Test
public void testSendMessage() throws IOException, TimeoutException {
// 1.建立连接
ConnectionFactory factory = new ConnectionFactory();
// 1.1.设置连接参数,分别是:主机名、端口号、vhost、用户名、密码
factory.setHost("192.168.150.101");
factory.setPort(5672);
factory.setVirtualHost("/");
factory.setUsername("root");
factory.setPassword("root");
// 1.2.建立连接
Connection connection = factory.newConnection();

// 2.创建通道Channel
Channel channel = connection.createChannel();

// 3.声明队列
String queueName = "simple.queue";
channel.queueDeclare(queueName, false, false, false, null);

// 4.发送消息
String message = "hello, rabbitmq!";
channel.basicPublish("", queueName, null, message.getBytes());
System.out.println("发送消息成功:【" + message + "】");

// 5.关闭通道和连接
channel.close();
connection.close();

}
}

consumer实现

  1. 建立连接
  2. 创建Channel
  3. 声明队列
  4. 订阅消息
1
2
3
4
5
6
7
8
9
10
11
12
13
14
15
16
17
18
19
20
21
22
23
24
25
26
27
28
29
30
31
32
33
34
35
36
37
38
39
40
41
import com.rabbitmq.client.Channel;
import com.rabbitmq.client.Connection;
import com.rabbitmq.client.ConnectionFactory;

import java.io.IOException;
import java.util.concurrent.TimeoutException;

public class ConsumerTest {

public static void main(String[] args) throws IOException, TimeoutException {
// 1.建立连接
ConnectionFactory factory = new ConnectionFactory();
// 1.1.设置连接参数,分别是:主机名、端口号、vhost、用户名、密码
factory.setHost("192.168.150.101");
factory.setPort(5672);
factory.setVirtualHost("/");
factory.setUsername("root");
factory.setPassword("root");
// 1.2.建立连接
Connection connection = factory.newConnection();

// 2.创建通道Channel
Channel channel = connection.createChannel();

// 3.声明队列,声明一个队列是幂等的——只有当它不存在时才会被创建,我们在这里再次声明队列可以防止队列为null
String queueName = "simple.queue";
channel.queueDeclare(queueName, false, false, false, null);

// 4.订阅消息
channel.basicConsume(queueName, true, new DefaultConsumer(channel){
@Override
public void handleDelivery(String consumerTag, Envelope envelope,
AMQP.BasicProperties properties, byte[] body) throws IOException {
// 5.处理消息
String message = new String(body);
System.out.println("接收到消息:【" + message + "】");
}
});
System.out.println("等待接收消息。。。。");
}
}
  • 但是这种写法,看着就很麻烦,其中设置连接参数时,和我们之前学JDBC一样,手动在代码中设置连接四要素,但是后来我们数据库的连接参数都是写在yml文件中来简化代码的,这里同理,所以我们继续往下学SpringAMQP

总结

  • 基本消息队列的消息发送流程
    1. 建立connection
    2. 创建channel
    3. 使用channel声明队列
    4. 使用channel向队列发送消息
  • 基本消息队列的消息接收流程
    1. 建立connection
    2. 创建channel
    3. 使用channel声明队列
    4. 定义consumer的消费行为handleDelivery(),也就是接收到消息后要执行的业务逻辑
    5. 利用channel将消费者与队列绑定

SpringAMQP

  • SpringAMQP官方地址:https://spring.io/projects/spring-amqp, 它是基于RabbitMQ封装的一套模板,提供了模板来发送和接收消息。包含两部分,其中spring-amqp是基础抽象,spring-rabbit是底层的默认实现,并且利用SpringBoot对其实现了自动装配,使用起来十分方便
  • AMQP(Advanced Message Queuing Portocol),是用于在应用程序指甲你传递业务消息的开放标准。该协议与语言和平台无关,更符合微服务中独立性的要求
  • SpringAMQP提供了三个功能
    1. 自动声明队列、交换机及其绑定关系
    2. 基于注解的监听模式,异步接收消息
    3. 封装了RabbitTemplate工具,用于发送消息(之前在Redis中我们也接触过RedisTemplate)

Basic Queue

  • 在父工程mq-demo中引入依赖
1
2
3
4
5
<!--AMQP依赖,包含RabbitMQ-->
<dependency>
<groupId>org.springframework.boot</groupId>
<artifactId>spring-boot-starter-amqp</artifactId>
</dependency>

消息发送

  • 首先配置MQ地址,在publisher服务的application.yml中添加配置
1
2
3
4
5
6
7
spring:
rabbitmq:
host: 192.168.128.130 ## 主机名
port: 5672 #端口
username: root ## 用户名
password: root ## 密码
virtual-host: / ## 虚拟主机
  • 然后在publisher服务中编写测试类SpringAmqpTest,并利用RabbitTemplate实现消息发送,如果没有创建simple.queue,可以在RabbitMQ管理平台
1
2
3
4
5
6
7
8
9
10
11
12
13
14
15
16
17
18
19
20
import org.junit.Test;
import org.junit.runner.RunWith;
import org.springframework.amqp.rabbit.core.RabbitTemplate;
import org.springframework.beans.factory.annotation.Autowired;
import org.springframework.boot.test.context.SpringBootTest;
import org.springframework.test.context.junit4.SpringRunner;

@RunWith(SpringRunner.class)
@SpringBootTest
public class SpringAmqpTest {
@Autowired
private RabbitTemplate rabbitTemplate;

@Test
public void testSimpleQueue() {
String queueName = "simple.queue";
String message = "Hello, SpringAMQP! ";
rabbitTemplate.convertAndSend(queueName, message);
}
}

消息接收

  • 刚刚我们已经完成了消息的发送,那么现在我们来完成消息的监听
  • 首先配置MQ地址,在consumer服务的application.yml中添加配置
1
2
3
4
5
6
7
spring:
rabbitmq:
host: 192.168.128.130 ## 主机名
port: 5672 #端口
username: root ## 用户名
password: root ## 密码
virtual-host: / ## 虚拟主机
  • 消费者要做的事情是监听消息,Spring已经帮我们跟MQ建立了连接,所以消费者只需要关心要监听哪个队列,以及监听到队列了,要干什么事儿
  • 在consumer服务新建一个类,编写消费逻辑,其中@Component注解是将该类声明为一个Bean,这样Spring才能找到它,然后使用@RabbitListener注解声明要监听的队列,msg参数就是接收到的消息,我们可以在方法体内编写对消息的处理逻辑,但这里只是简单的输出了一下
1
2
3
4
5
6
7
@Component
public class SpringRabbitListener {
@RabbitListener(queues = "simple.queue")
public void listenSimpleQueueMessage(String msg) {
System.out.println("Spring 消费者接收到消息:【" + msg + "】");
}
}
  • 启动consumer服务,控制台可以看到接收到的消息,并且如果多次使用publisher服务发送消息,consumer服务也会接收多次消息,表现为控制台也输出多次语句
1
2
Spring 消费者接收到消息:【Hello, SpringAMQP! 】

小结

  • SpringAMQP如何接收消息?
    • 引入amqp的starter依赖
    • 配置RabbitMQ地址
    • 定义类,添加@Component注解
    • 类中声明方法,添加@RabbitListener注解,方法参数就时消息

注意:消息一旦消费就会从队列删除,RabbitMQ没有消息回溯功能

Wrok Queue

  • Work Queue,也被称为(Task queues),任务模型。简单来说就是让多个消费者绑定到一个队列,共同消费队列中的信息。
  • 当消息处理比较耗时的时候,可能生产消息的速度会远远大于消息的消费速度,长此以往,消息就会堆积的越来越多,无法及时处理。
  • 此时就可以使用Work模型,多个消费者共同处理消息,那么处理速度就能大大提高了

image-20240603105441957

消息发送

  • 这次我们循环发送消息,模拟大量消息堆积的场景
  • 在publisher服务中的SpringAmqpTest类中新增测试方法
1
2
3
4
5
6
7
8
9
10
11
@Test
public void testWorkQueue() throws InterruptedException {
String queueName = "simple.queue";
String message = "Hello, SpringAMQP! __ ";
for (int i = 1; i <= 50; i++) {
// 循环发送50条消息,带上消息编号
rabbitTemplate.convertAndSend(queueName, message + i);
// 休眠20ms,模拟在1s内发送完
Thread.sleep(20);
}
}

消息接收

  • 要模拟多个消费者绑定同一个队列,我们在consumer服务的SpringRabbitListener中添加两个方法
1
2
3
4
5
6
7
8
9
10
11
12
13
@RabbitListener(queues = "simple.queue")
public void listenWorkQueueMessage1(String msg) throws InterruptedException {
System.out.println("消费者1 接收到消息:【" + msg + "】" + LocalDateTime.now());
// 休眠20ms,1s大致能处理50条消息
Thread.sleep(20);
}

@RabbitListener(queues = "simple.queue")
public void listenWorkQueueMessage2(String msg) throws InterruptedException {
System.err.println("消费者2........接收到消息:【" + msg + "】" + LocalDateTime.now());
// 休眠200ms,1s大概能处理5条消息
Thread.sleep(200);
}

测试

  • 启动consumer服务后,执行publisher服务中刚编写的测试方法,发送50条消息,查看控制台输出
1
2
3
4
5
6
7
8
9
10
11
12
13
14
15
16
17
18
19
20
21
22
23
24
25
26
27
28
29
30
31
32
33
34
35
36
37
38
39
40
41
42
43
44
45
46
47
48
49
50
消费者2........接收到消息:【Hello, SpringAMQP! __ 1】2022-12-23T13:16:41.407
消费者1 接收到消息:【Hello, SpringAMQP! __ 2】2022-12-23T13:16:41.414
消费者1 接收到消息:【Hello, SpringAMQP! __ 4】2022-12-23T13:16:41.461
消费者1 接收到消息:【Hello, SpringAMQP! __ 6】2022-12-23T13:16:41.502
消费者1 接收到消息:【Hello, SpringAMQP! __ 8】2022-12-23T13:16:41.549
消费者1 接收到消息:【Hello, SpringAMQP! __ 10】2022-12-23T13:16:41.592
消费者2........接收到消息:【Hello, SpringAMQP! __ 3】2022-12-23T13:16:41.609
消费者1 接收到消息:【Hello, SpringAMQP! __ 12】2022-12-23T13:16:41.635
消费者1 接收到消息:【Hello, SpringAMQP! __ 14】2022-12-23T13:16:41.680
消费者1 接收到消息:【Hello, SpringAMQP! __ 16】2022-12-23T13:16:41.722
消费者1 接收到消息:【Hello, SpringAMQP! __ 18】2022-12-23T13:16:41.767
消费者2........接收到消息:【Hello, SpringAMQP! __ 5】2022-12-23T13:16:41.811
消费者1 接收到消息:【Hello, SpringAMQP! __ 20】2022-12-23T13:16:41.813
消费者1 接收到消息:【Hello, SpringAMQP! __ 22】2022-12-23T13:16:41.858
消费者1 接收到消息:【Hello, SpringAMQP! __ 24】2022-12-23T13:16:41.902
消费者1 接收到消息:【Hello, SpringAMQP! __ 26】2022-12-23T13:16:41.944
消费者1 接收到消息:【Hello, SpringAMQP! __ 28】2022-12-23T13:16:41.990
消费者2........接收到消息:【Hello, SpringAMQP! __ 7】2022-12-23T13:16:42.013
消费者1 接收到消息:【Hello, SpringAMQP! __ 30】2022-12-23T13:16:42.035
消费者1 接收到消息:【Hello, SpringAMQP! __ 32】2022-12-23T13:16:42.078
消费者1 接收到消息:【Hello, SpringAMQP! __ 34】2022-12-23T13:16:42.122
消费者1 接收到消息:【Hello, SpringAMQP! __ 36】2022-12-23T13:16:42.165
消费者1 接收到消息:【Hello, SpringAMQP! __ 38】2022-12-23T13:16:42.210
消费者2........接收到消息:【Hello, SpringAMQP! __ 9】2022-12-23T13:16:42.215
消费者1 接收到消息:【Hello, SpringAMQP! __ 40】2022-12-23T13:16:42.256
消费者1 接收到消息:【Hello, SpringAMQP! __ 42】2022-12-23T13:16:42.300
消费者1 接收到消息:【Hello, SpringAMQP! __ 44】2022-12-23T13:16:42.343
消费者1 接收到消息:【Hello, SpringAMQP! __ 46】2022-12-23T13:16:42.387
消费者2........接收到消息:【Hello, SpringAMQP! __ 11】2022-12-23T13:16:42.416
消费者1 接收到消息:【Hello, SpringAMQP! __ 48】2022-12-23T13:16:42.431
消费者1 接收到消息:【Hello, SpringAMQP! __ 50】2022-12-23T13:16:42.473
消费者2........接收到消息:【Hello, SpringAMQP! __ 13】2022-12-23T13:16:42.617
消费者2........接收到消息:【Hello, SpringAMQP! __ 15】2022-12-23T13:16:42.819
消费者2........接收到消息:【Hello, SpringAMQP! __ 17】2022-12-23T13:16:43.021
消费者2........接收到消息:【Hello, SpringAMQP! __ 19】2022-12-23T13:16:43.224
消费者2........接收到消息:【Hello, SpringAMQP! __ 21】2022-12-23T13:16:43.425
消费者2........接收到消息:【Hello, SpringAMQP! __ 23】2022-12-23T13:16:43.626
消费者2........接收到消息:【Hello, SpringAMQP! __ 25】2022-12-23T13:16:43.827
消费者2........接收到消息:【Hello, SpringAMQP! __ 27】2022-12-23T13:16:44.027
消费者2........接收到消息:【Hello, SpringAMQP! __ 29】2022-12-23T13:16:44.229
消费者2........接收到消息:【Hello, SpringAMQP! __ 31】2022-12-23T13:16:44.431
消费者2........接收到消息:【Hello, SpringAMQP! __ 33】2022-12-23T13:16:44.634
消费者2........接收到消息:【Hello, SpringAMQP! __ 35】2022-12-23T13:16:44.837
消费者2........接收到消息:【Hello, SpringAMQP! __ 37】2022-12-23T13:16:45.040
消费者2........接收到消息:【Hello, SpringAMQP! __ 39】2022-12-23T13:16:45.240
消费者2........接收到消息:【Hello, SpringAMQP! __ 41】2022-12-23T13:16:45.444
消费者2........接收到消息:【Hello, SpringAMQP! __ 43】2022-12-23T13:16:45.646
消费者2........接收到消息:【Hello, SpringAMQP! __ 45】2022-12-23T13:16:45.846
消费者2........接收到消息:【Hello, SpringAMQP! __ 47】2022-12-23T13:16:46.048
消费者2........接收到消息:【Hello, SpringAMQP! __ 49】2022-12-23T13:16:46.250
  • 可以看到消费者1很快就完成了自己的25条消息,消费者2却在缓慢的处理自己的25条消息
  • 也就是说当前的处理方式是平均分配给每个消费者,并没有按照我们设定的处理能力来处理消息,这样显然是有问题的,消费者2很大概率会出现消息积压的风险

【上述例子,我的理解是2个消费者,其中一个消费奇数,另外一个消费偶数。拿到的数量都是一样的!】

能者多劳

  • 在spring中有一个简单的配置,可以解决这个问题。我们修改consumer服务中的application.yml文件,添加如下配置
1
2
3
4
5
spring:
rabbitmq:
listener:
simple:
prefetch: 1 ## 每次只能获取一条消息,处理完成才能获取下一个消息
  • 重启服务,查看控制台输出
1
2
3
4
5
6
7
8
9
10
11
12
13
14
15
16
17
18
19
20
21
22
23
24
25
26
27
28
29
30
31
32
33
34
35
36
37
38
39
40
41
42
43
44
45
46
47
48
49
50
51
52
DNS

消费者2........接收到消息:【Hello, SpringAMQP! __ 1】2022-12-23T13:37:15.252
消费者1 接收到消息:【Hello, SpringAMQP! __ 2】2022-12-23T13:37:15.262
消费者1 接收到消息:【Hello, SpringAMQP! __ 3】2022-12-23T13:37:15.284
消费者1 接收到消息:【Hello, SpringAMQP! __ 4】2022-12-23T13:37:15.307
消费者1 接收到消息:【Hello, SpringAMQP! __ 5】2022-12-23T13:37:15.331
消费者1 接收到消息:【Hello, SpringAMQP! __ 6】2022-12-23T13:37:15.354
消费者1 接收到消息:【Hello, SpringAMQP! __ 7】2022-12-23T13:37:15.377
消费者1 接收到消息:【Hello, SpringAMQP! __ 8】2022-12-23T13:37:15.399
消费者1 接收到消息:【Hello, SpringAMQP! __ 9】2022-12-23T13:37:15.422
消费者1 接收到消息:【Hello, SpringAMQP! __ 10】2022-12-23T13:37:15.444
消费者2........接收到消息:【Hello, SpringAMQP! __ 11】2022-12-23T13:37:15.464
消费者1 接收到消息:【Hello, SpringAMQP! __ 12】2022-12-23T13:37:15.486
消费者1 接收到消息:【Hello, SpringAMQP! __ 13】2022-12-23T13:37:15.509
消费者1 接收到消息:【Hello, SpringAMQP! __ 14】2022-12-23T13:37:15.533
消费者1 接收到消息:【Hello, SpringAMQP! __ 15】2022-12-23T13:37:15.559
消费者1 接收到消息:【Hello, SpringAMQP! __ 16】2022-12-23T13:37:15.583
消费者1 接收到消息:【Hello, SpringAMQP! __ 17】2022-12-23T13:37:15.606
消费者1 接收到消息:【Hello, SpringAMQP! __ 18】2022-12-23T13:37:15.630
消费者1 接收到消息:【Hello, SpringAMQP! __ 19】2022-12-23T13:37:15.653
消费者2........接收到消息:【Hello, SpringAMQP! __ 20】2022-12-23T13:37:15.668
消费者1 接收到消息:【Hello, SpringAMQP! __ 21】2022-12-23T13:37:15.687
消费者1 接收到消息:【Hello, SpringAMQP! __ 22】2022-12-23T13:37:15.710
消费者1 接收到消息:【Hello, SpringAMQP! __ 23】2022-12-23T13:37:15.732
消费者1 接收到消息:【Hello, SpringAMQP! __ 24】2022-12-23T13:37:15.755
消费者1 接收到消息:【Hello, SpringAMQP! __ 25】2022-12-23T13:37:15.777
消费者1 接收到消息:【Hello, SpringAMQP! __ 26】2022-12-23T13:37:15.801
消费者1 接收到消息:【Hello, SpringAMQP! __ 27】2022-12-23T13:37:15.825
消费者1 接收到消息:【Hello, SpringAMQP! __ 28】2022-12-23T13:37:15.847
消费者1 接收到消息:【Hello, SpringAMQP! __ 29】2022-12-23T13:37:15.871
消费者2........接收到消息:【Hello, SpringAMQP! __ 30】2022-12-23T13:37:15.885
消费者1 接收到消息:【Hello, SpringAMQP! __ 31】2022-12-23T13:37:15.908
消费者1 接收到消息:【Hello, SpringAMQP! __ 32】2022-12-23T13:37:15.930
消费者1 接收到消息:【Hello, SpringAMQP! __ 33】2022-12-23T13:37:15.955
消费者1 接收到消息:【Hello, SpringAMQP! __ 34】2022-12-23T13:37:15.977
消费者1 接收到消息:【Hello, SpringAMQP! __ 35】2022-12-23T13:37:16
消费者1 接收到消息:【Hello, SpringAMQP! __ 36】2022-12-23T13:37:16.021
消费者1 接收到消息:【Hello, SpringAMQP! __ 37】2022-12-23T13:37:16.043
消费者1 接收到消息:【Hello, SpringAMQP! __ 38】2022-12-23T13:37:16.065
消费者1 接收到消息:【Hello, SpringAMQP! __ 39】2022-12-23T13:37:16.087
消费者2........接收到消息:【Hello, SpringAMQP! __ 40】2022-12-23T13:37:16.107
消费者1 接收到消息:【Hello, SpringAMQP! __ 41】2022-12-23T13:37:16.130
消费者1 接收到消息:【Hello, SpringAMQP! __ 42】2022-12-23T13:37:16.153
消费者1 接收到消息:【Hello, SpringAMQP! __ 43】2022-12-23T13:37:16.174
消费者1 接收到消息:【Hello, SpringAMQP! __ 44】2022-12-23T13:37:16.197
消费者1 接收到消息:【Hello, SpringAMQP! __ 45】2022-12-23T13:37:16.219
消费者1 接收到消息:【Hello, SpringAMQP! __ 46】2022-12-23T13:37:16.242
消费者1 接收到消息:【Hello, SpringAMQP! __ 47】2022-12-23T13:37:16.264
消费者1 接收到消息:【Hello, SpringAMQP! __ 48】2022-12-23T13:37:16.286
消费者1 接收到消息:【Hello, SpringAMQP! __ 49】2022-12-23T13:37:16.310
消费者2........接收到消息:【Hello, SpringAMQP! __ 50】2022-12-23T13:37:16.330
  • 这次处理消息的比例差不多就是10:1了,能者多劳

总结

  • Wrok模型的使用:
    • 多个消费者绑定到一个队列,同一条消息只会被一个消费者处理
    • 通过设置prefetch来控制消费者预取的消息数量

发布订阅

  • 发布订阅的模型如图
  • 可以看到,在订阅模型中,多了一个exchange角色,而且过程略有变化
    • Publisher:生产者,也就是要发送消息的程序,但是不再发送到队列中,而是发送给exchange(交换机)
    • Exchange:交换机。一方面,接收生产者发送的消息;另一方面,知道如何处理消息,例如递交给某个特别队列、递交给所有队列、或者是将消息对其。到底如何操作,取决于Exchange的类型。Exchange有以下三种类型
      1. Fanout:广播,将消息交给所有绑定到交换机的队列
      2. Direct:定向,把消息交给符合指定routing key的队列
      3. Topic:通配符,把消息交给符合routing pattern(路由模式)的队列
    • Consumer:消费者,与以前一样,订阅队列,没有变化
    • Queue:消息队列也与之前一样,接收消息,缓存消息

Exchange(交换机)只负责转发消息,不具备存储消息的能力。因此如果没有任何队列与Exchange绑定,或者没有符合路由规则的队列,那么消息会丢失!

Fanout

  • Fanout直译是扇出,但是在MQ中叫广播更合适

image-20240603110921169

  • 在广播模式下,消息发送流程是这样的
    1. 可以存在多个队列
    2. 每个队列都要绑定到Exchange(交换机)
    3. 生产者发送消息,只能发送到交换机,交换机来决定要发给哪个队列,而不是生产者来决定
    4. 交换机把消息发送给绑定过的所有队列
    5. 订阅队列的消费者都能拿到消息

声明队列和交换机

  • Spring提供了一个接口Exchange,来表示所有不同类型的交换机

image-20240603110936450

  • 在consumer中创建一个类,声明队列和交换机
1
2
3
4
5
6
7
8
9
10
11
12
13
14
15
16
17
18
19
20
21
22
23
24
25
26
27
28
29
30
31
32
33
34
35
36
37
38
39
40
41
42
43
44
45
46
47
48
49
50
import org.springframework.amqp.core.Binding;
import org.springframework.amqp.core.BindingBuilder;
import org.springframework.amqp.core.FanoutExchange;
import org.springframework.amqp.core.Queue;
import org.springframework.context.annotation.Bean;
import org.springframework.context.annotation.Configuration;

@Configuration
public class FanoutConfig {
/**
* 声明交换机
* @return Fanout类型交换机
*/
@Bean
public FanoutExchange fanoutExchange() {
return new FanoutExchange("exchange");
}

/**
* 第1个队列
*/
@Bean
public Queue queue1() {
return new Queue("queue1");
}

/**
* 绑定第1个队列和交换机
*/
@Bean
public Binding bindingQueue1(Queue queue1, FanoutExchange fanoutExchange) {
return BindingBuilder.bind(queue1).to(fanoutExchange);
}

/**
* 第2个队列
*/
@Bean
Queue queue2() {
return new Queue("queue2");
}

/**
* 绑定第2个队列和交换机
*/
@Bean
public Binding bindingQueue2(Queue queue2, FanoutExchange fanoutExchange) {
return BindingBuilder.bind(queue2).to(fanoutExchange);
}
}

消息发送

  • publisher服务的SpringAmqpTest类中添加测试方法
1
2
3
4
5
6
@Test
public void testFanoutExchange() {
String exchangeName = "exchange";
String message = "Hello Everyone~";
rabbitTemplate.convertAndSend(exchangeName, "", message);
}

消息接收

  • consumer服务的SpringRabbitListener中添加两个方法作为消费者
1
2
3
4
5
6
7
8
9
@RabbitListener(queues = "queue1")
public void listenFanoutQueue1(String msg) {
System.out.println("消费者1收到广播消息:【" + msg + "】");
}

@RabbitListener(queues = "queue2")
public void listenFanoutQueue2(String msg) {
System.out.println("消费者2收到广播消息:【" + msg + "】");
}
  • 重启consumer服务,运行publisher中新编写的测试方法,控制台输出如下
1
2
消费者1收到广播消息:【Hello Everyone~】
消费者2收到广播消息:【Hello Everyone~】

总结

  • 交换机的作用是什么?
    1. 接收publisher发送的消息
    2. 将消息按照规则路由到与之绑定的队列
    3. 不能缓存消息,路由失败,消息丢失
    4. FanoutExchange会将消息路由到每个绑定的队列
  • 声明队列、交换机、绑定关系的Bean是什么?
    • Queue
    • FanoutExchange
    • Binding

Direct

  • Fanout模式中,一条消息,会被所有订阅的队列都消费,但是在某些场景下,我们希望不同的消息被不同的队列消费,这时就要用到Direct类型的Exchange

  • 1
    Direct

    模型下

    • 队列与虚拟机绑定,不能是任意绑定了,而是需要指定一个RoutingKey(路由key)
    • 消息的发送方在向Exchange发送消息时,也必须指定消息的RoutingKey
    • Exchange不再把消息交给每一个绑定的队列,而是根据消息的RoutingKey进行判断,只有队列的RoutingKey与消息的RoutingKey完全一致,才会收到消息

案例需求如下:

  1. 路由RabbitListener声明ExchangeQueueRoutingKey
  2. consumer服务中,编写两个消费者方法,分别监听direct.queue1direct.queue2
  3. publisher中编写测试方法,向directExchange发送消息

基于注解声明队列和交换机

  • 基于Bean的方式声明队列与交换机比较麻烦,所以Spring还提供了基于注解方式来声明(Spring 永远滴神)
  • consumerSpringRabbitListener中添加两个消费者,同时基于注解来声明队列和交换机
1
2
3
4
5
6
7
8
9
10
11
12
13
14
15
16
17
@RabbitListener(bindings = @QueueBinding(
value = @Queue(name = "direct.queue1"),
exchange = @Exchange(name = "directExchange", type = ExchangeTypes.DIRECT),
key = {"Apex", "DeepRock"}
))
public void listenDirectQueue1(String msg) {
System.out.println("消费者收到direct.queue1的消息:【" + msg + "】");
}

@RabbitListener(bindings = @QueueBinding(
value = @Queue(name = "direct.queue2"),
exchange = @Exchange(name = "directExchange", type = ExchangeTypes.DIRECT),
key = {"Apex", "Terraria"}
))
public void listenDirectQueue2(String msg) {
System.out.println("消费者收到direct.queue2的消息:【" + msg + "】");
}

消息发送

  • publisher服务的SpringAmqpTest类中添加测试方法
1
2
3
4
5
6
7
8
9
10
11
12
13
14
15
16
17
18
19
20
@Test
public void testDirectExchange() {
String exchangeName = "directExchange";
String message = "打派派,上号";
rabbitTemplate.convertAndSend(exchangeName, "Apex", message);
}
//
@Test
public void testDirectExchange() {
String exchangeName = "directExchange";
String message = "Rock And Stone,上号";
rabbitTemplate.convertAndSend(exchangeName, "DeepRock", message);
}
//
@Test
public void testDirectExchange() {
String exchangeName = "directExchange";
String message = "今晚打猪鲨,上号";
rabbitTemplate.convertAndSend(exchangeName, "Terraria", message);
}
  • 运行以上三个测试方法,控制台输出如下
1
2
3
4
5
FORTRAN
消费者收到direct.queue2的消息:【打派派,上号】
消费者收到direct.queue1的消息:【打派派,上号】
消费者收到direct.queue1的消息:【Rock And Stone,上号】
消费者收到direct.queue2的消息:【今晚打猪鲨,上号】

总结

  • Direct

    交换机与Fanout

    交换机的差异?

    • Fanout交换机将信息路由给每一个与之绑定的队列
    • Direct交换机根据RoutingKey判断路由给哪个队列
    • 如果多个队列具有相同的RoutingKey,则与Fanout功能类似,路由给每一个路由匹配的队列
  • 基于@RabbitListener

    注解声明队列和交换机有哪些常见的注解?

    • @QueueBinding
    • @Queue
    • @Exchange

Topic

说明

  • Topic类型的Exchange与Direct相比,都是可以根据RoutingKey把消息路由到不同的队列,只不过Topic类型的Exchange可以rag队列绑定Routing Key的时候使用通配符
  • Routing Key一般都是由一个或多个单词组成,多个单词间以.分割,例如item.insert
  • 通配符规则
    • #:匹配一个或多个词
    • *:仅匹配一个词

举例:

  • item.#:能够匹配item.kyle.violet或者item.kyle
  • item.*:只能匹配item.kyle或者item.violet

image-20240603111438169

  • 解释
    • Queue1绑定的是china.#,因此凡是以china.开头的Routing Key都会被匹配到,包括china.newschina.weather
    • Queue2绑定的是#.news,因此凡是以.news结尾的Routing Kye都会被匹配到,包括china.newsjapan.news

案例需求如下图

image-20240603111455738

  1. 利用@RabbitListener明ExchangeQueueRoutingKey
  2. consumer服务中,编写两个消费者方法,分别监听topic.queue1topic.queue2
  3. publisher中编写测试方法,向topic发送消息

消息发送

  • publisher服务的SpringAmqpTest类中添加测试方法
1
2
3
4
5
6
@Test
public void testTopicExchange() {
String exchangeName = "topic";
String message = "如何看待马化腾称「短视频会侵蚀游戏时间」,「腾讯游戏要聚焦精品」?";
rabbitTemplate.convertAndSend(exchangeName, "china.news", message);
}

消息接收

  • consumer服务的SpringRabbitListener中添加方法,一个队列通配符为china.#,一个队列通配符为#.news
1
2
3
4
5
6
7
8
9
10
11
12
13
14
15
16
17
18

@RabbitListener(bindings = @QueueBinding(
value = @Queue(name = "topic.queue1"),
exchange = @Exchange(name = "topic", type = ExchangeTypes.TOPIC),
key = "china.#"
))
public void listenTopicQueue1(String msg) {
System.out.println("消费者接收到topic.queue1的消息:【" + msg + "】");
}

@RabbitListener(bindings = @QueueBinding(
value = @Queue(name = "topic.queue2"),
exchange = @Exchange(name = "topic", type = ExchangeTypes.TOPIC),
key = "#.news"
))
public void listenTopicQueue2(String msg) {
System.out.println("消费者接收到topic.queue2的消息:【" + msg + "】");
}
  • 重启consumer服务,运行publisher服务中编写的测试方法,控制台输出如下
1
2
消费者接收到topic.queue2的消息:【如何看待马化腾称「短视频会侵蚀游戏时间」,「腾讯游戏要聚焦精品」?】
消费者接收到topic.queue1的消息:【如何看待马化腾称「短视频会侵蚀游戏时间」,「腾讯游戏要聚焦精品」?】
  • 修改测试方法,并运行
1
2
3
4
5
6
@Test
public void testTopicExchange() {
String exchangeName = "topic";
String message = "今 天 也 是 个 emo 的 好 天 气";
rabbitTemplate.convertAndSend(exchangeName, "china.weather", message);
}
  • 控制台输出如下
1
消费者接收到topic.queue1的消息:【今 天 也 是 个 emo 的 好 天 气】
  • 修改测试方法,并运行
1
2
3
4
5
6
@Test
public void testTopicExchange() {
String exchangeName = "topic";
String message = "自由美利坚,枪击每一天";
rabbitTemplate.convertAndSend(exchangeName, "us.news", message);
}
  • 控制台输出如下
1
消费者接收到topic.queue2的消息:【自由美利坚,枪击每一天】

总结

Direct交换机与Topic交换机的差异?

  • Topic交换机接收的消息Routing Key必须是多个单词,以.分隔
  • Topic交换机与队列绑定时的binding key可以指定通配符
    • #:表示0个或多个单词
    • *:仅表示1个单词

消息转换器

  • 之前说过,Spring会把发送的消息序列化为字节发送给MQ,接收消息的时候,会将字节反序列化为Java对象
  • 但是默认情况下,Spring采用的序列化方式是JDK序列化,众所周知,JDK序列化存在以下问题
    1. 数据体积过大
    2. 有安全漏洞
    3. 可读性差

因此可以使用json配置!